Motivation
The purpose of this document is to provide a clear, step-by-step guide for setting up and configuring a Windows development environment specifically tailored for kernel and driver development. Novice developers often face compatibility and configuration issues that make it difficult to get started. This documentation explains practical steps and provides recommendations for configuring a VM with Windows 11 for Kernel Debugging and Driver Development. The setup is designed to work on the same machine with Visual Studio, where the driver is built and automatically provisioned to the target VM for testing and debugging. Additionally, this document includes PowerShell scripts to automate parts of the manual work involved in creating and configuring the virtual machine.
How Our Target Configuration Looks
We want to achieve this configuration:
- Build drivers on our laptop with automatic signing using a self-signed certificate and other features like WPP tracing generation
- Automatically provision the driver to the target virtual machine
- Set breakpoints in WinDbg and break at them when specific events occur
In the screenshot below, this happens when DriverEntry is executed by the I/O manager when it loads the driver.
In this way, we will be able to debug drivers as regular user-mode code, and this is what we are going to achieve.
Requirements and Prerequisites
There are some requirements that have to be accomplished before we go further with the installation process. Just take a look at them before getting started.
To debug the Windows Kernel / develop Windows Drivers, you should have the following components (for the detailed installation steps, see: Installation Steps):
- Windows 10/11 (Windows 10 support will end soon, Windows 11 recommended). We are going to use Hyper-V which is available only for Windows Pro/Enterprise/Education versions, and these instructions will not work for Windows 10 Home edition, so it looks like for Windows Home you have to use Oracle Virtual Box or VMware Workstation, but steps of the configuration are similar.
- Visual Studio 2022 with “C++ development tools” included during installation process
- Windows Driver Kit (WDK) – only corresponding versions of VS and WDK work together; please carefully check version compatibility. Unfortunately, this information is not provided on the official website anymore, so please see as example the Version Compatibility Matrix below in case you need to work with previous versions of VS and WDK.
- Microsoft Hyper-V (for debugging kernel and drivers on virtual machine)
For better performance, use modern hardware CPU like i7/i9 (13th, 14th gen) and 16+ GB of RAM if you debug on the same machine. If you configure debugging over the physical network, do not forget to ensure that your network card is supported by the kernel for debugging: https://learn.microsoft.com/en-us/windows-hardware/drivers/debugger/supported-ethernet-nics-for-network-kernel-debugging-in-windows-10
Microsoft Hardware Requirements
The full hardware requirements can be found on the official site: https://learn.microsoft.com/en-us/windows-hardware/drivers/download-the-wdk, but we assume that you are developing for the x64 platform as the most popular and widely used.
Version Compatibility
WDK may only work with specific versions of Visual Studio. If you download the latest versions from the official site:
they should work together correctly.
It can be practical, when downloading the latest versions of Visual Studio and WDK online installers, to:
- create offline installers using the layout command (see Creating Offline Installers).
- rename directories to reflect the specific version, such as WDK 10.0.22621, to simplify installation and facilitate working with previous versions if needed.
For more details on why this might be important, check this blog post.
If you have a paid subscription, the previous versions should be available to you.
For example, these previously verified pairs of VS and WDK work together correctly:
| Visual Studio | WDK Version | Windows SDK | Supported Target OS |
|---|---|---|---|
| VS 2022 | WDK 10.0.22621 | 10.0.22621 | Windows 10/11 |
| VS 2019 | WDK 10.0.19041.685 | 10.0.19041 | Windows 10 |
| VS 2017 | WDK 10.0.17763.1 | 10.0.17763 | Windows 10 |
Important: Always use matching versions of Visual Studio and WDK according to Microsoft documentation to avoid compatibility issues.
Important: Always use matching versions of SDK and WDK. Even when SDK is included by default in the Visual Studio installation, download the corresponding SDK version from the Microsoft site. The SDK contains headers and libraries that are mostly related to the user mode part of the Windows OS. Avoid situations where the versions of SDK and WDK configured for a project are different, as new features or bug fixes may require changes in both components.
Tip: You can install more than one version of Visual Studio and WDK together, and they might work correctly, but there are numerous examples of problems with this approach.
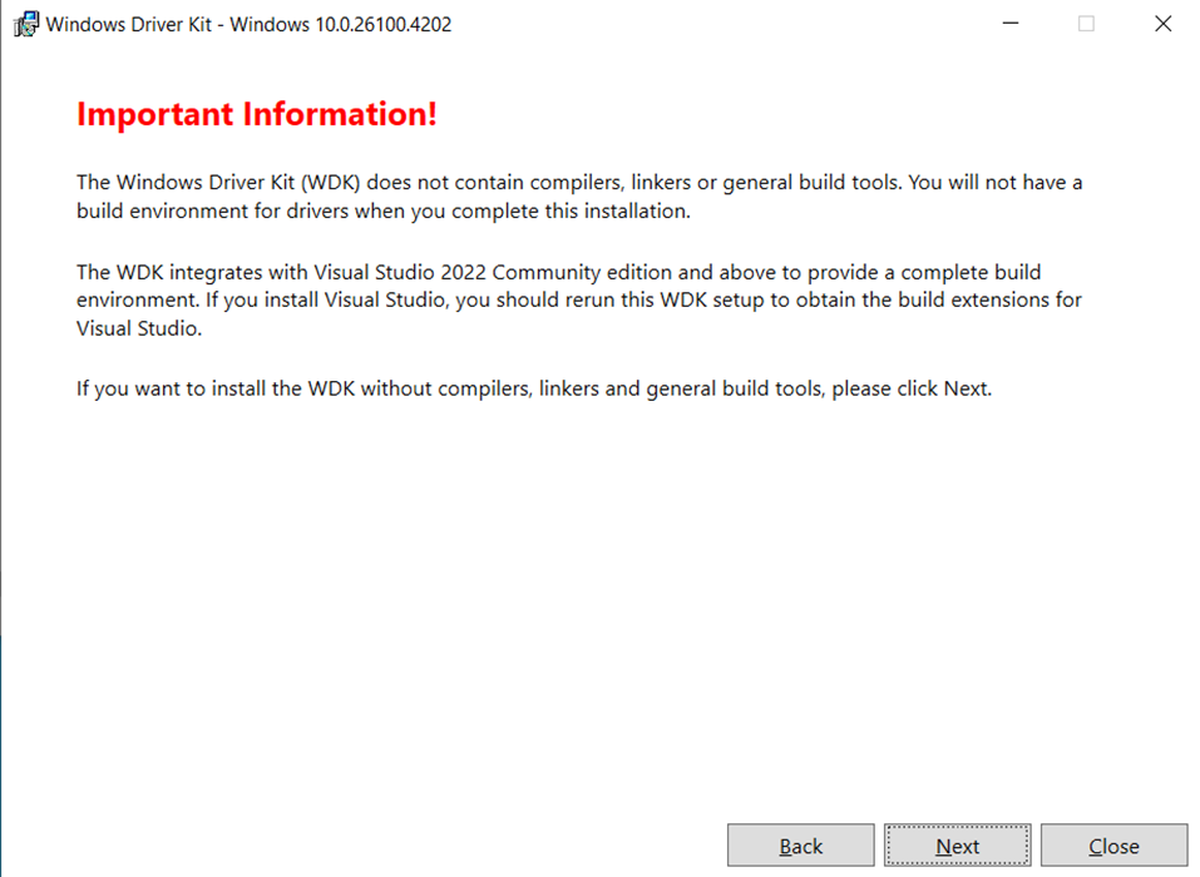
Some sources suggest that you can install VS2019 with the latest version of WDK to support development for Windows versions as early as Windows 7. While this may have worked in the past, as of August 2025, this combination is no longer functional. The WDK installer itself explicitly states that only VS2022 is supported:
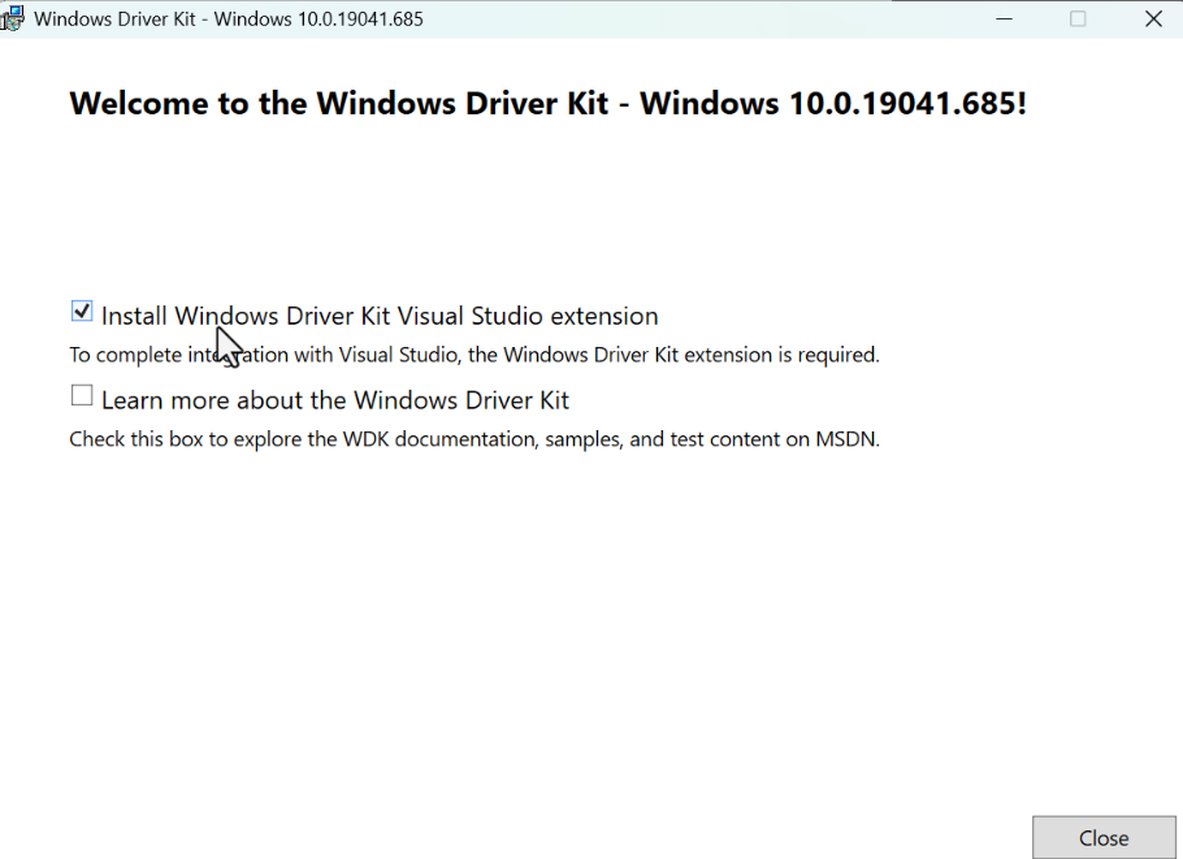
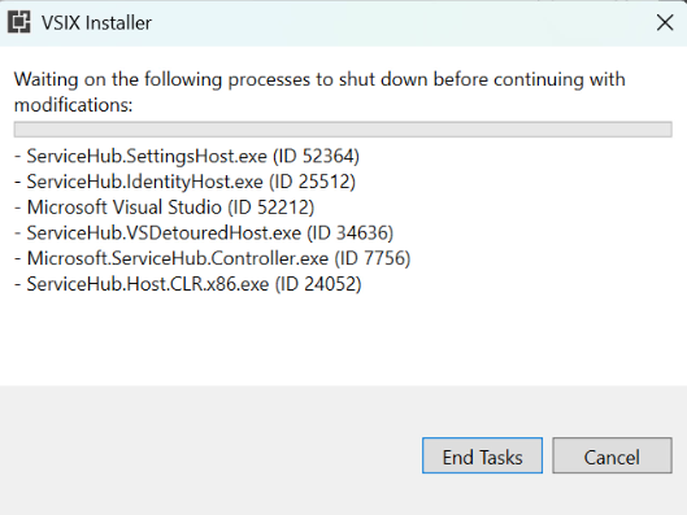
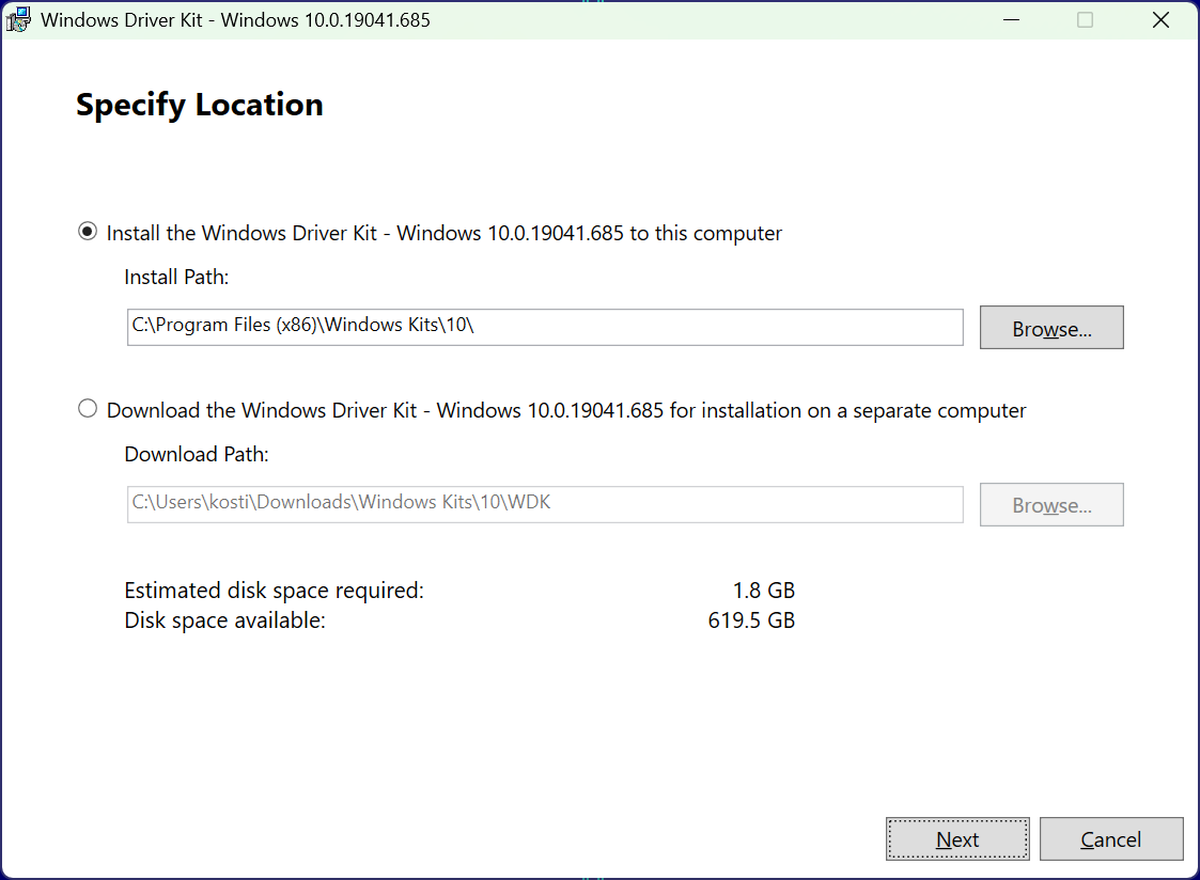
For VS versions lower than 2022, such as VS 2019 with WDK 10.0.19041.685, the installation of WDK should end with installing the Windows Driver Kit Visual Studio extension as seen in these screenshots. This extension allows you to create new driver projects in Visual Studio:
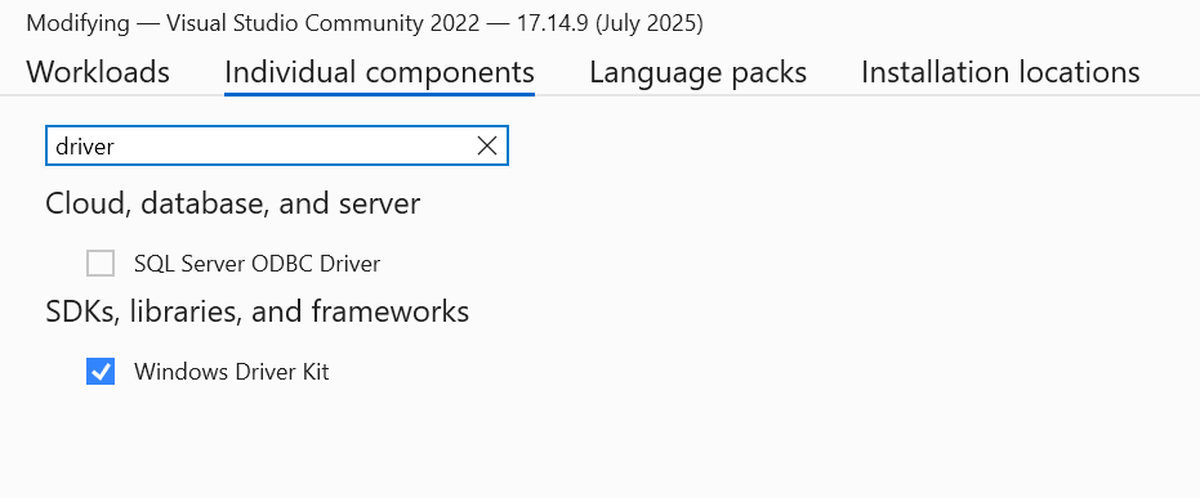
Conversely, for Visual Studio 2022 installations, you need to select specific additional components in the “Individual components” tab as shown below:
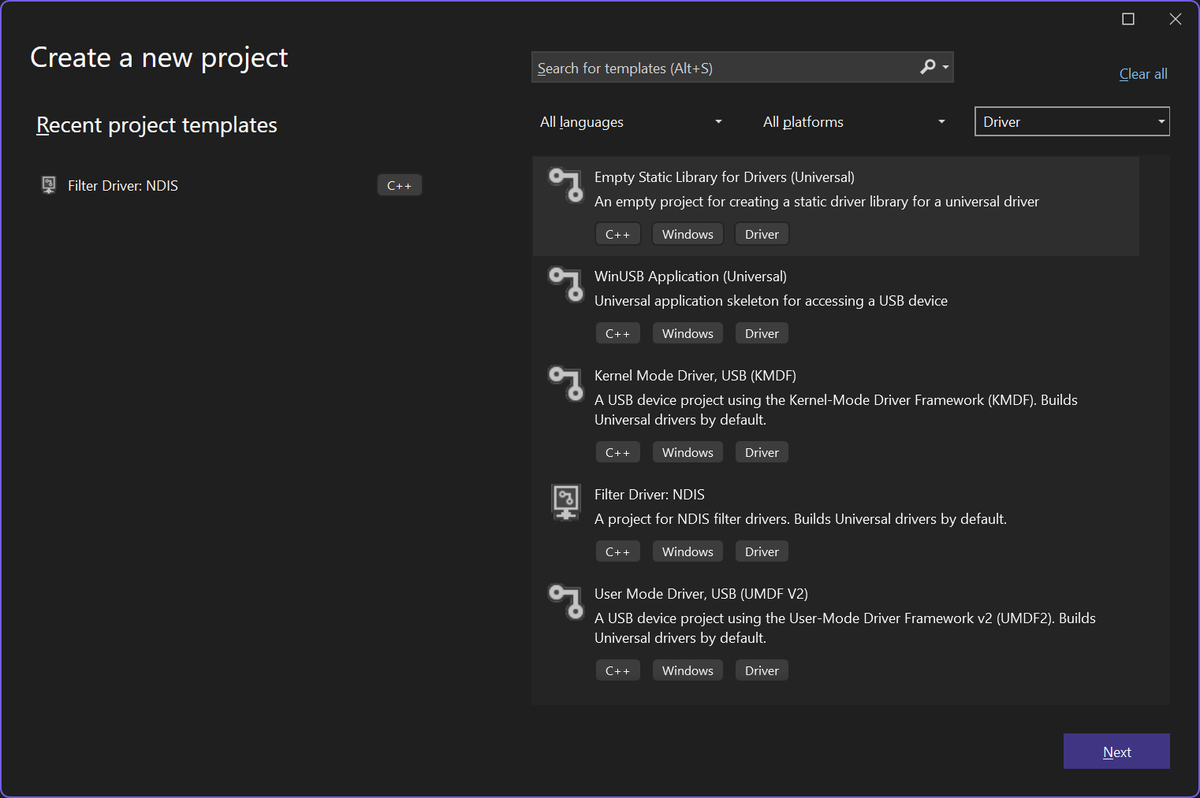
to install driver-related project templates that previously shipped with WDK:
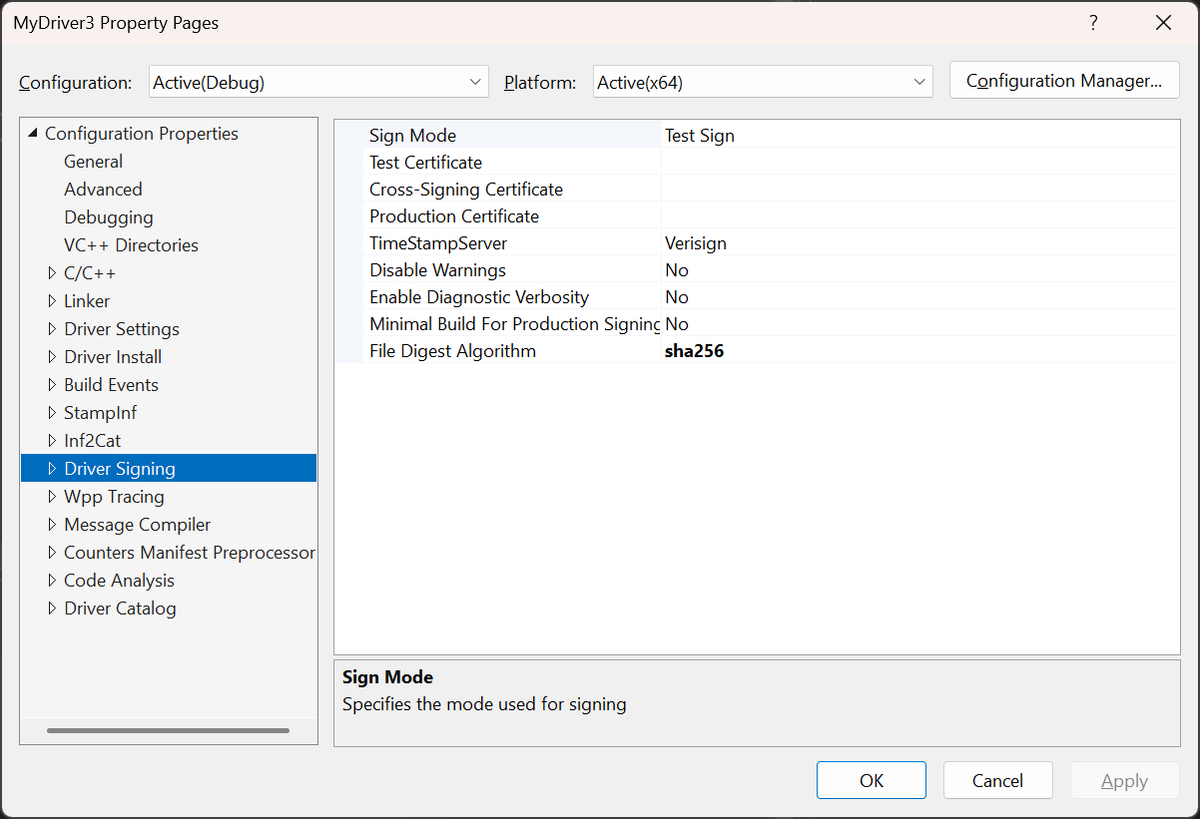
These projects contain useful configuration properties for:
- Driver Settings
- Driver Install
- WPP Tracing configuration
- Driver Signing, and more
that simplify driver development, see screenshot below:
Developing for different OS Versions with Visual Studio and WDK
For information regarding driver development for different versions of Windows, please refer to this comprehensive blog post:
The Windows Driver Kit and Visual Studio 2022
Even though using Windows 10 for kernel debugging is easier for many reasons, it seems that Visual Studio 2022 does not support WDK for Windows 10. You can verify this here:
It appears that the only viable option (except using EWDK) to support kernel development for both Windows 10 and Windows 11 is to use Visual Studio 2019 with Windows 11 21H2 WDK.
Additional Installation Resources
The official instructions for installing and configuring Visual Studio and WDK from Microsoft can be found at:
Now that we have covered the necessary details, let’s proceed with the installation.
Installation Steps
-
Download and install Visual Studio 2022. For additional requirements, check the Visual Studio 2022 System Requirements.
-
During Visual Studio installation, select and install the following components in “Individual Components” tab:
- MSVC v143 – VS 2022 C++ x64/x86 Spectre-mitigated libs (Latest)
- Desktop development with C++ (which also includes Windows SDK)
- Windows Driver Kit (available in VS 2022, not in previous versions)
- C++ MFC for the latest v143 build tools with Spectre Mitigations (x86 & x64)
-
Download and install the Windows SDK from the official Microsoft website according to the official documentation. You must download and install the same version of the SDK as the WDK and then use this version of SDK in your project settings. When new OS functionality arrives or bugs are fixed, these changes are incorporated into the SDK and WDK code, including headers and libraries, so the versions must match each other. The version of WDK or SDK consists of two values:
– the build number
– QFE (Quick Fix Engineering)
For example, if you have WDK 10.0.26100.4654, the build number is 10.0.26100 and the QFE is 4654. You must keep the build number the same for both WDK and SDK. The QFE values can be different unless your driver uses functionality that isn’t available in your current API version. -
Download and install the Windows Driver Kit (WDK) from the official Microsoft website.
Tip: You can view the specific versions of WDK during the setup process, as shown below:
Install a compatible version of WDK for your Visual Studio version. Some examples are provided in the Version Compatibility Matrix.
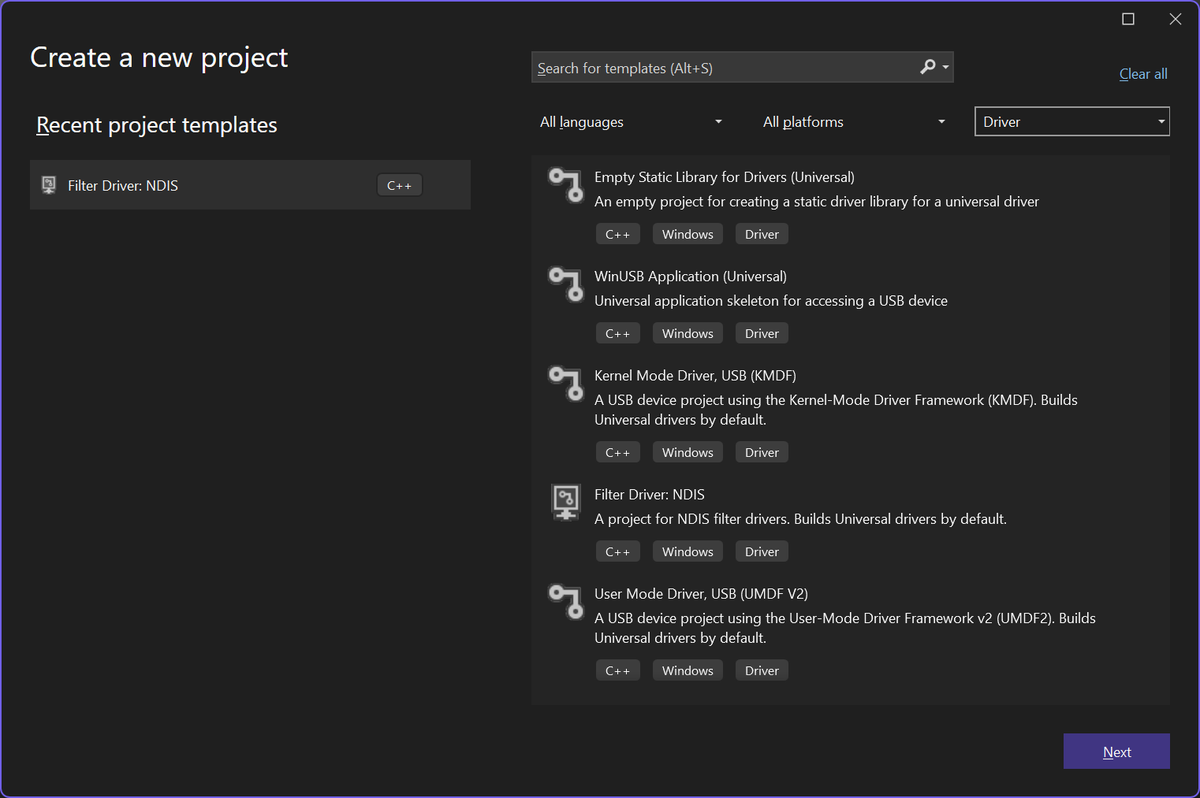
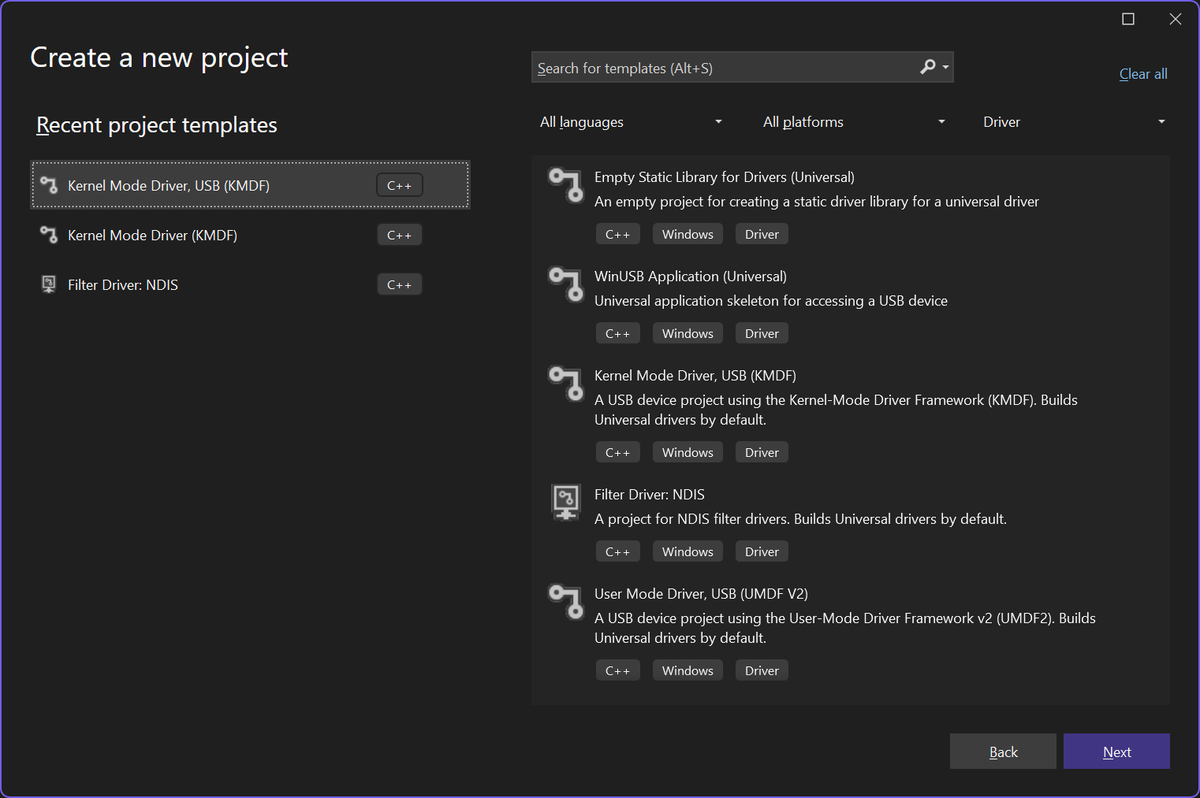
The installation is successful when you can open Visual Studio, select File > Create New Project, and see the Windows Driver-specific project templates available in the UI, as demonstrated below:
You can then create a new driver project:
and successfully build it:
Congratulations! You have successfully installed and configured Visual Studio and WDK. The next step is to configure a virtual machine (VM) on Hyper-V for drivers development and kernel debugging.
Hyper-V Windows 11 Installation and Configuration for Kernel Debugging
Prerequisites for Hyper-V Setup
Ensure your system meets the following requirements:
- Windows 10 Pro, Enterprise, or Education (Hyper-V is not available on Windows 10 Home).
- 64-bit processor.
- 16 GB RAM minimum (more than 16 Gb is recommended).
- Sufficient disk space for virtual machines (40+ GB recommended).
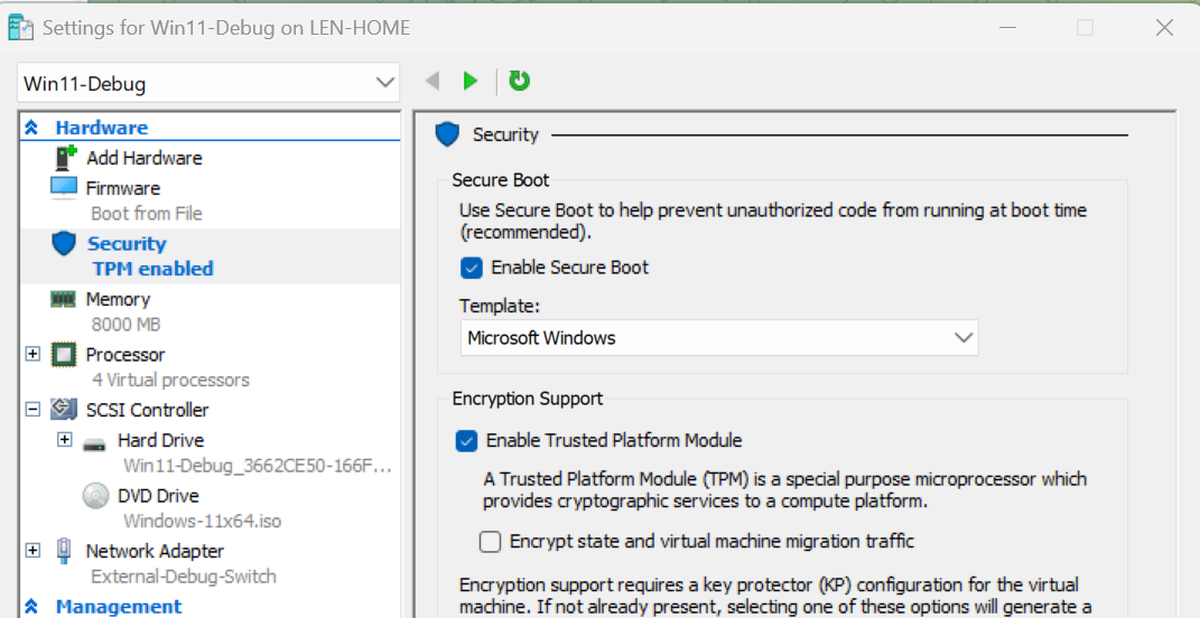
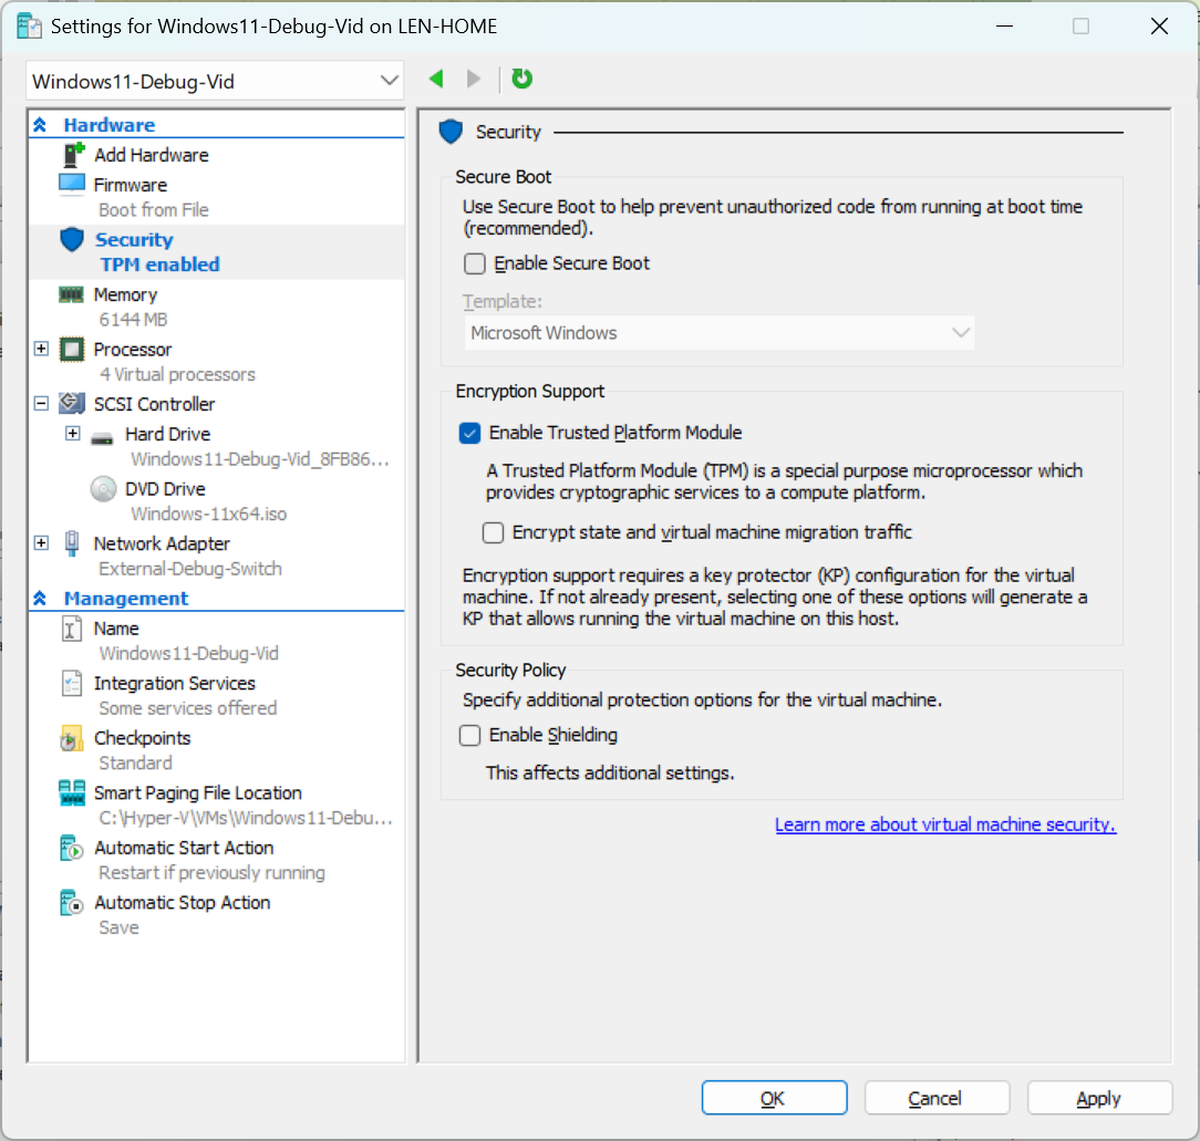
- Secure Boot is enabled. It’s only needed during installation and should be disabled later during kernel debugging configuration (a requirement for Windows 11 setup).
- TPM is enabled (a requirement for Windows 11 setup).
Mandatory Security Configuration for Windows 11 Installation
Note: You will need to disable Secure Boot later to allow
bcdedit.exeto configure kernel debugging during the creation of a new device in Visual Studio: Extensions / Driver / Test / Configure Devices for driver provisioning.
Also, please refer to the official documentation for additional details.
You can bypass these checks in a Shift+F10 terminal window by executing the following commands:
reg add "HKLM\SYSTEM\Setup\LabConfig" /f
reg add "HKLM\SYSTEM\Setup\LabConfig" /v BypassRAMCheck /t REG_DWORD /d 1 /f
reg add "HKLM\SYSTEM\Setup\LabConfig" /v BypassSecureBootCheck /t REG_DWORD /d 1 /f
reg add "HKLM\SYSTEM\Setup\LabConfig" /v BypassTPMCheck /t REG_DWORD /d 1 /f
reg add "HKLM\SYSTEM\Setup\LabConfig" /v BypassCPUCheck /t REG_DWORD /d 1 /f
reg add "HKLM\SYSTEM\Setup\LabConfig" /v BypassStorageCheck /t REG_DWORD /d 1 /f
Step 1: Enable Hyper-V Feature
Using PowerShell (Administrator)
# Enable Hyper-V feature and management tools
Enable-WindowsOptionalFeature -Online -FeatureName Microsoft-Hyper-V -All

Restart-Computer
Verify Hyper-V Installation
# Check if Hyper-V is properly installed
Get-WindowsOptionalFeature -FeatureName Microsoft-Hyper-V-All -Online
Step 2: Create Virtual Switch for Debugging
Create External Virtual Switch (Recommended)
# List available network adapters
Get-NetAdapter

# Create external virtual switch (replace "Ethernet" with your adapter name)
New-VMSwitch -Name "External-Debug-Switch" -NetAdapterName "Ethernet" -AllowManagementOS $true

# Verify virtual switch creation
Get-VMSwitch
Step 3: Create Windows 11 Hyper-V VM
Create Windows 11 ISO
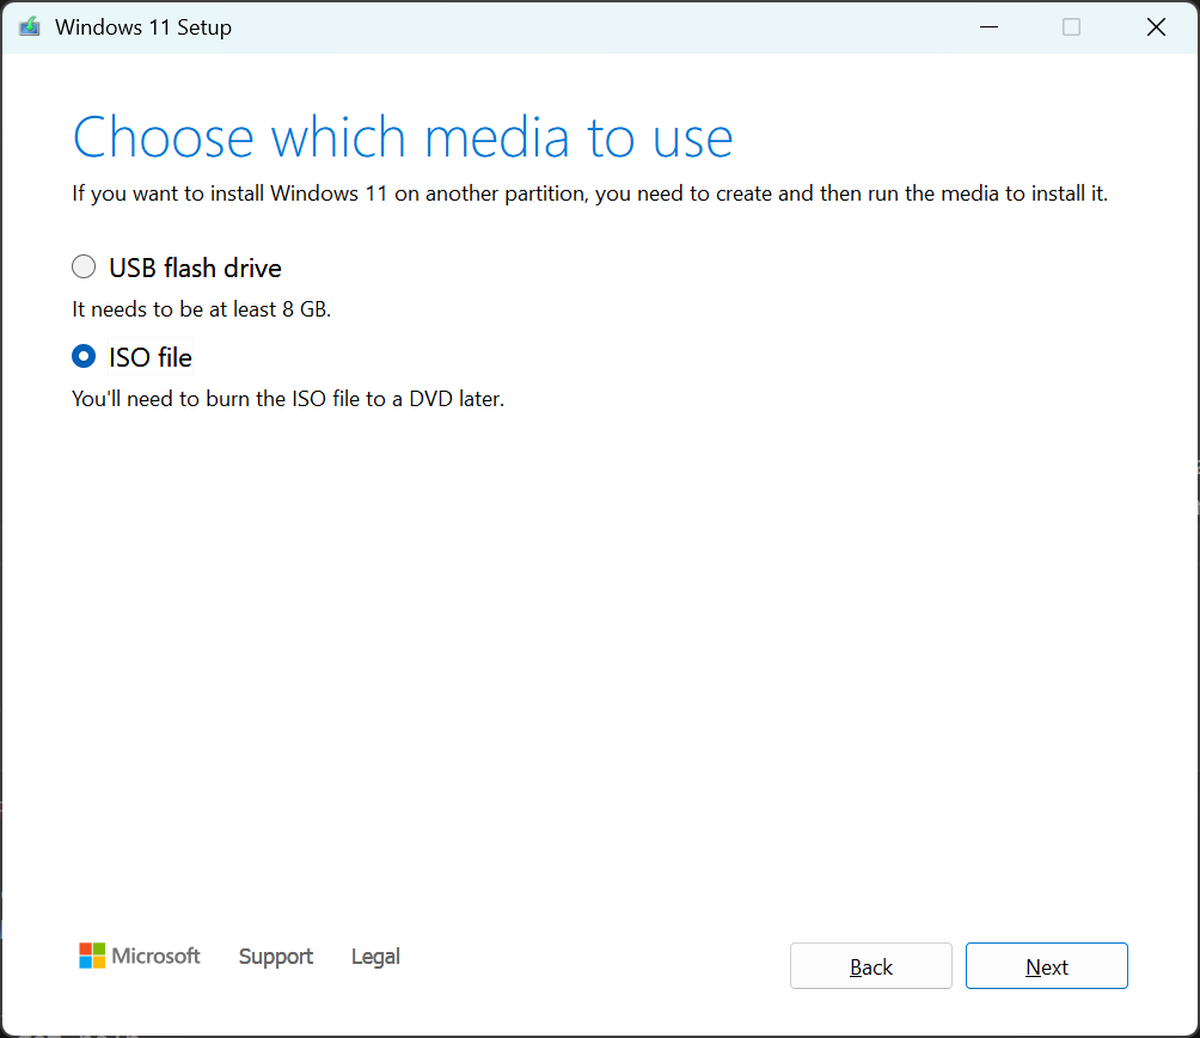
Download the Media Creation Tool from the official Microsoft site, run it, and select the option to create an ISO image. Save this image in a directory that will be used later by the PowerShell script for Windows 11 installation.
Store the ISO in an accessible location (e.g., C:\ISOs\Windows11.iso)
Create VM using PowerShell
Execute the script below in Windows Powershell ISE:
# Define VM parameters
$VMName = "Windows11-Debug-Vid"
$VMPath = "C:\Hyper-V\VMs"
$VHDPath = "C:\Hyper-V\VHDs\$VMName.vhdx"
$ISOPath = "C:\ISO\Windows-11x64.iso"
$SwitchName = "External-Debug-Switch"

# Create VM directory structure
New-Item -Path $VMPath -ItemType Directory -Force
New-Item -Path "C:\Hyper-V\VHDs" -ItemType Directory -Force

# Create new virtual machine
New-VM -Name $VMName -MemoryStartupBytes 6GB -Generation 2 -NewVHDPath $VHDPath -NewVHDSizeBytes 80GB -SwitchName $SwitchName -Path $VMPath

# Configure VM settings
Set-VM -Name $VMName -ProcessorCount 4 -DynamicMemory -MemoryMinimumBytes 6GB -MemoryMaximumBytes 8GB

# Enable secure boot to match minimal Windows 11 installation requirements. Later when we configure kernel for debugging, this has to be disabled
Set-VMFirmware -VMName $VMName -EnableSecureBoot On

Set-VMKeyProtector -VMName $VMName  -NewLocalKeyProtector
Enable-VMTPM -VMName $VMName

# Mount ISO
Add-VMDvdDrive -VMName $VMName -Path $ISOPath

# Set DVD as first boot device
$DVD = Get-VMDvdDrive -VMName $VMName
Set-VMFirmware -VMName $VMName -FirstBootDevice $DVD

# Start the VM
Start-VM -Name $VMName
Go through all steps of installation, set the computer name during installation (this is important). At the end, create a local administrator account using the following PowerShell script:
$Username = "admin"
$Password = "P@ssw0rd!" | ConvertTo-SecureString -AsPlainText -Force

New-LocalUser -Name $Username -Password $Password -FullName "Local Admin" -Description "Local Administrator Account"

Add-LocalGroupMember -Group "Administrators" -Member $Username
where $Password variable equals your real password. We create additional local user for simplifying local Windows OS management.
Disable firewall on VM. This is needed for communication between the host and target machine (virtual machine)
Set-NetFirewallProfile -Profile Domain,Public,Private -Enabled False
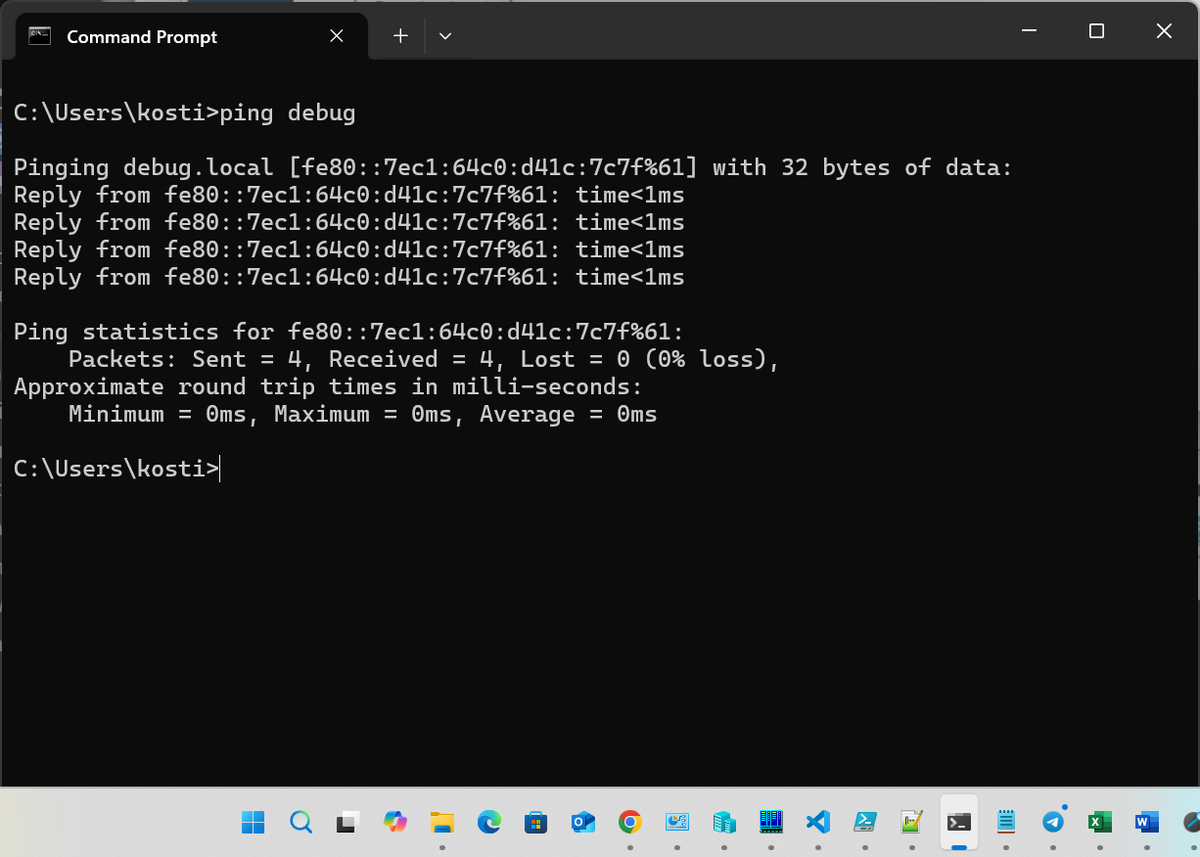
After this you should be able to ping target machine (virtual machine) by the name of the host. This name is provided during installation
Stop other components on the VM that are not needed and can degrade performance. Note that some of the code below may not work as it is specific to certain Windows versions.
Set-MpPreference -DisableRealtimeMonitoring $true
# works only on Pro/Enterprise
Set-ItemProperty -Path "HKLM:\SOFTWARE\Policies\Microsoft\Windows Defender" -Name "DisableAntiSpyware" -Value 1 -Force

Stop-Service WinDefend -Force
Set-Service WinDefend -StartupType Disabled

# stop and disable Windows Update
Stop-Service wuauserv -Force
Set-Service wuauserv -StartupType Disabled

Stop-Process -Name OneDrive -Force -ErrorAction SilentlyContinue
Start-Sleep -Seconds 2
# For 64-bit
if (Test-Path "$env:SYSTEMROOT\SysWOW64\OneDriveSetup.exe") {
    Start-Process "$env:SYSTEMROOT\SysWOW64\OneDriveSetup.exe" "/uninstall" -Wait
}
Go to the enhanced session in the console by clicking on the icon in the toolbar, and log in using the Admin account you created earlier (ensure the checkbox in View > Enhanced Session is selected).
In the enhanced session, you can copy and paste via the clipboard and drag and drop files.
Create a checkpoint (Action > Checkpoint) to restore the original state in case of misconfiguration.
Power off the Virtual Machine, and in the VM settings, disable Secure Boot
Disabling Secure Boot is neccessary to allow configure kernel debug parameters with bcdedit utility that will be used by TAEF (see below).
Step 5: Automatic Configuration of Target VM for Kernel Debugging / Driver Debugging
TAEF (Test Authoring and Execution Framework) is a testing framework that simplifies driver testing and provisioning. The key features of TAEF include:
- support for automatic configuration of the target machine for kernel debugging (you don’t need to manually configure VM with
bcdedit). - integration with Visual Studio, which simplifies this process.
For more details, refer to the official documentation.
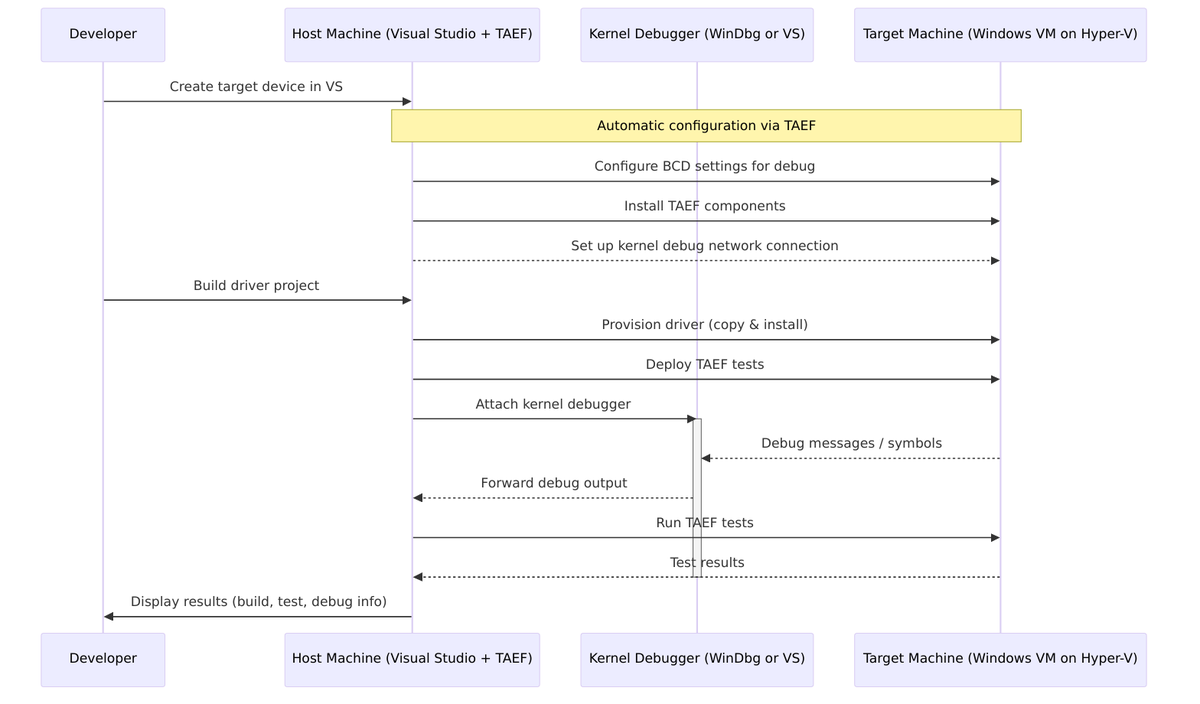
The hypothetical sequence diagram below (since we don’t have access to the TAEF source code) explains how WDK TAEF helps with driver development:
While kernel debugging configuration is a straightforward part of this process, the real advantages are the automated driver provisioning after changes and the ability to debug drivers directly in Visual Studio (though WinDbg remains the preferred choice, as Visual Studio reuses WinDbg’s COM-based API, such as DbgEng.dll).
To set up the target VM with TAEF:
Disable the firewall or add an allow rule on your host machine (the kernel will connect to your machine via the UDP port configured with bcdedit during provisioning)
-
Locate the installer on your host machine:
- Navigate to:
C:\Program Files (x86)\Windows Kits\10\Remote\x64\ - You’ll find
WDK Test Target Setup x64-x64_en-us.msi
- Navigate to:
-
Transfer the installer to the Target VM:
- Use Hyper-V Enhanced Session to copy/paste the file
- Or transfer via shared folder, network share, or VM connection
-
Install on the Target VM:
- Run the MSI installer with administrator privileges
-
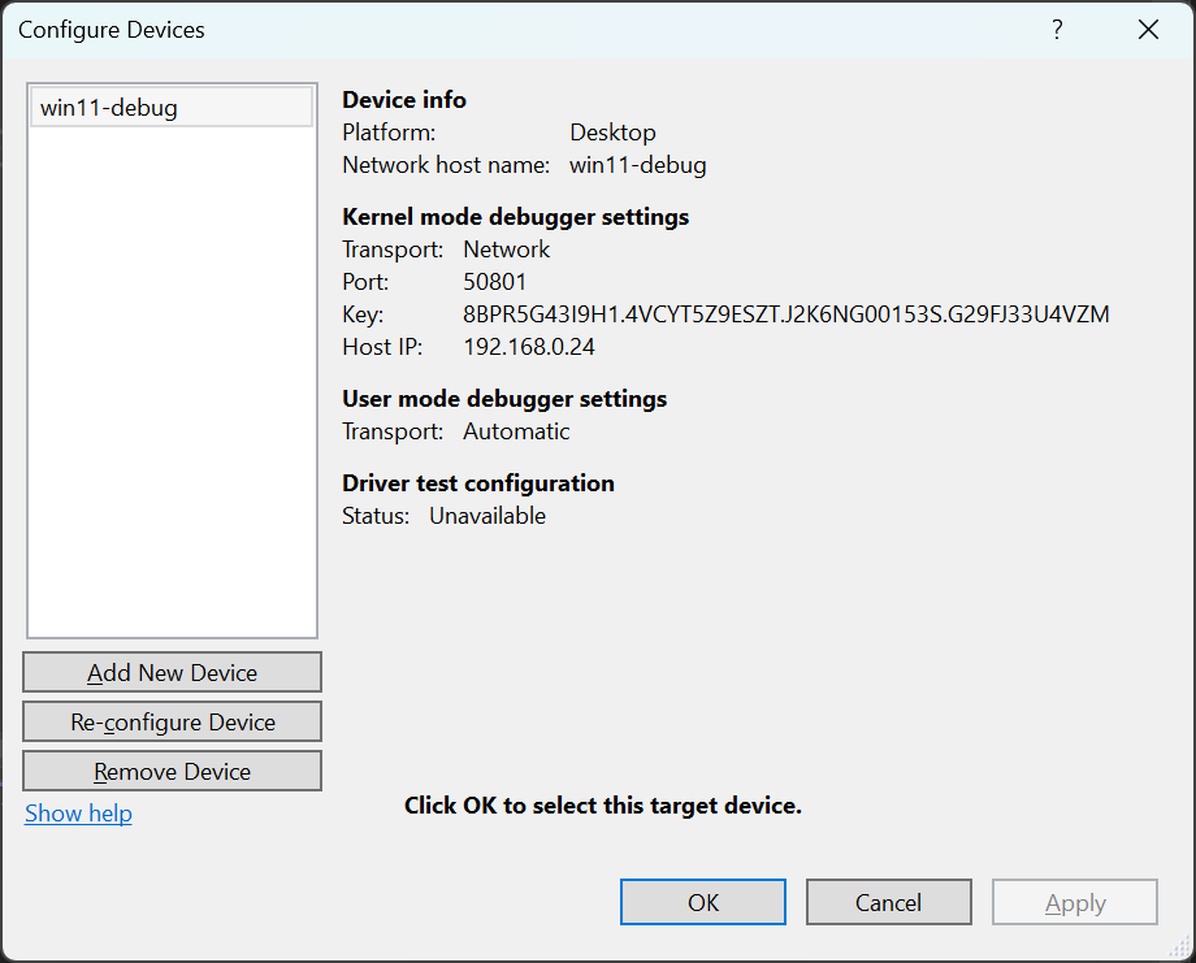
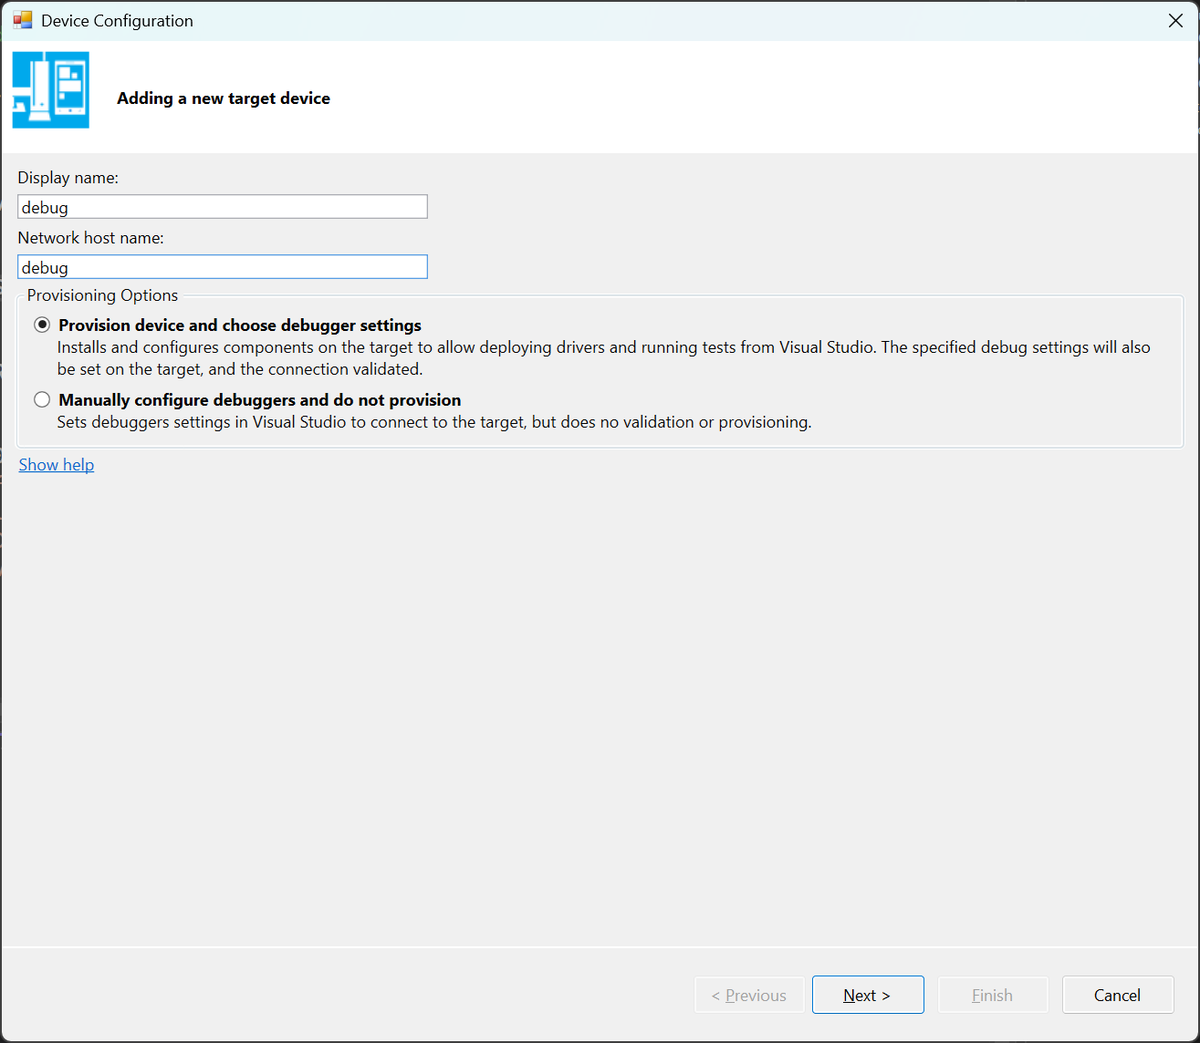
Run Visual Studio 2022 and go to Extensions / Driver / Test / Configure Devices
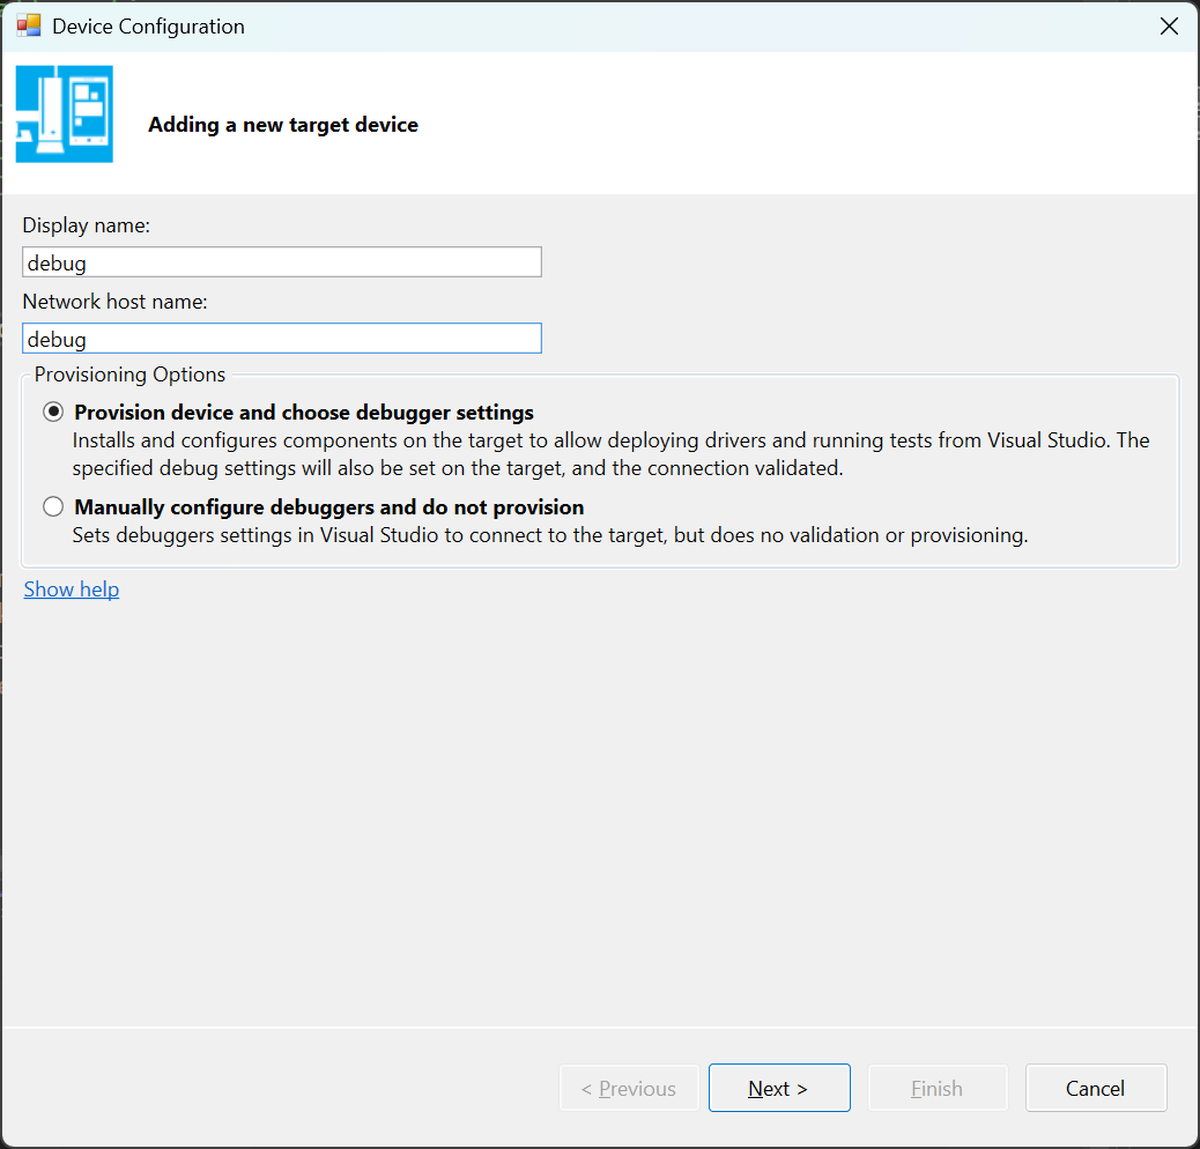
Click on “Add new device” and enter the VM computer name as shown below:
Select “Provision device and choose the debugger settings”:
In the next window, enter the IP address of your adapter with the (External-Debug-Switch) suffix at the end.
For example, 192.168.0.24.
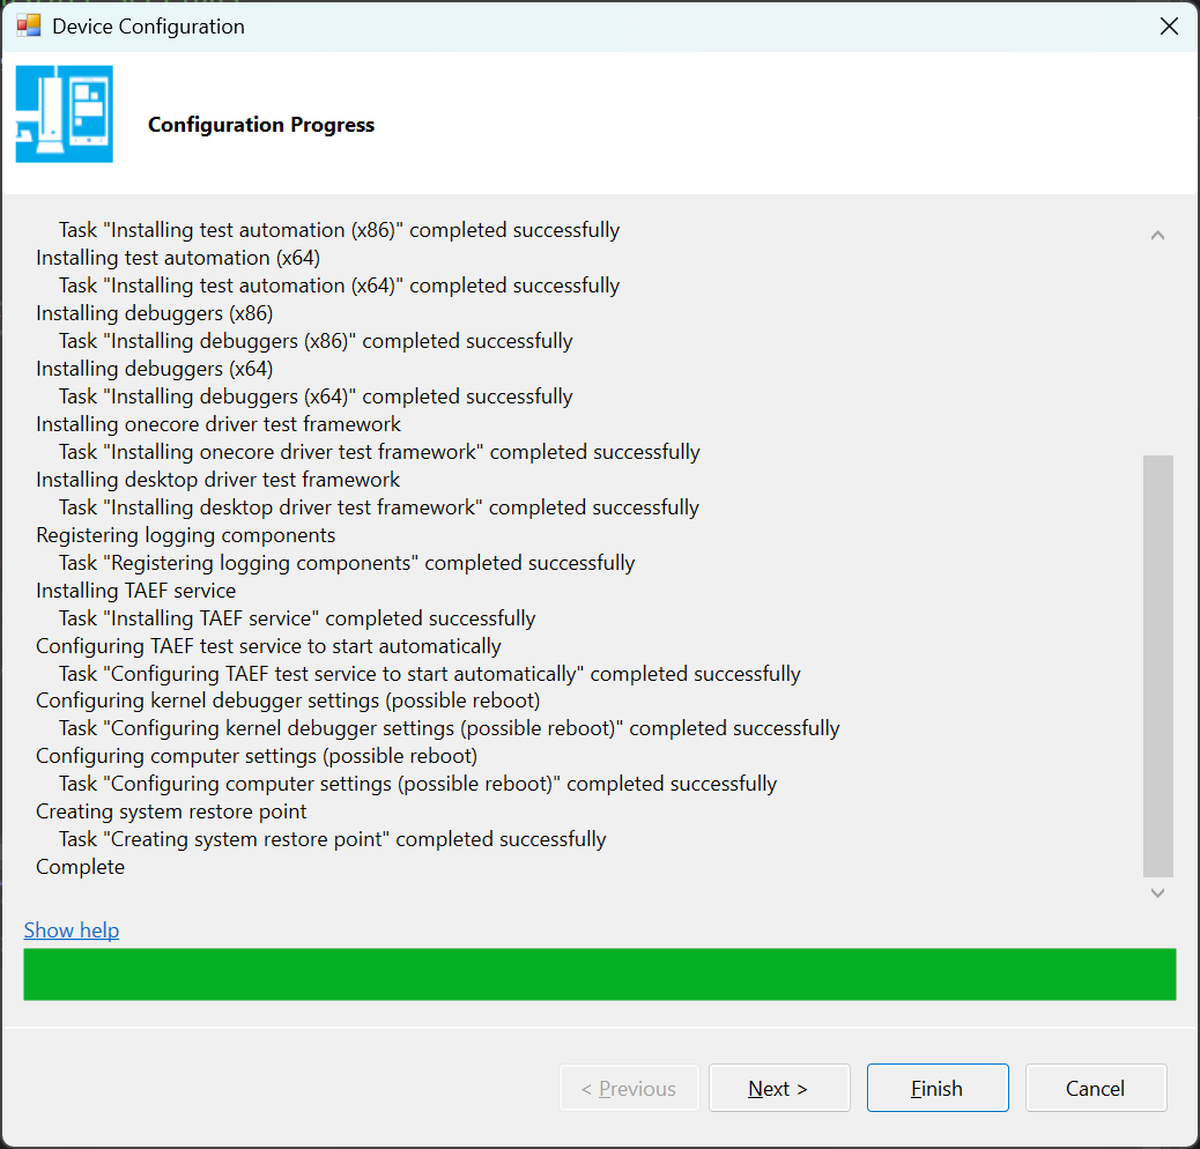
Click “Next”, and Visual Studio will automatically install all components required for running drivers on the remote machine and configure the kernel for network debugging.
All steps must be completed successfully. If you encounter any issues, review the logs for details. Problems may arise if, for instance, you attempt to use Windows 10 with the WDK for Windows 11 or other incompatible combinations. However, with Visual Studio 2022 and the WDK for Windows 11, everything should work correctly.
The Kernel debug configuration
What actually happens during provisioning relate to the kernel configuration is that the bcdedit command is run on the target (virtual) machine with parameters like:
bcdedit /dbgsettings net hostip:192.168.0.24 port:50037 key=y5lf39ruw39v.aqp28sm2lyp9.vw43zj6u2csc.dhtk9ayk7egm
Where:
bcdedit /dbgsettings net: Configures kernel debugging to use the network transport instead of COM, USB, or 1394 (FireWire).hostip:192.168.0.24: This is the IP address of the debugging host machine (the one running WinDbg).port:50037: UDP port number used for the debugging session. Both machines must allow communication over this port.key=...: This is the encryption key for the network debugging session.
Also special Windows service on the target machine will allow to perform
Creating Offline Installers
As mentioned earlier, creating offline installers for Visual Studio or the Windows Driver Kit (WDK) can be helpful. Below are the commands to achieve this:
Visual Studio Community
Windows Driver Kit
Tip: Store these offline installers on external storage to ensure they are available when needed.
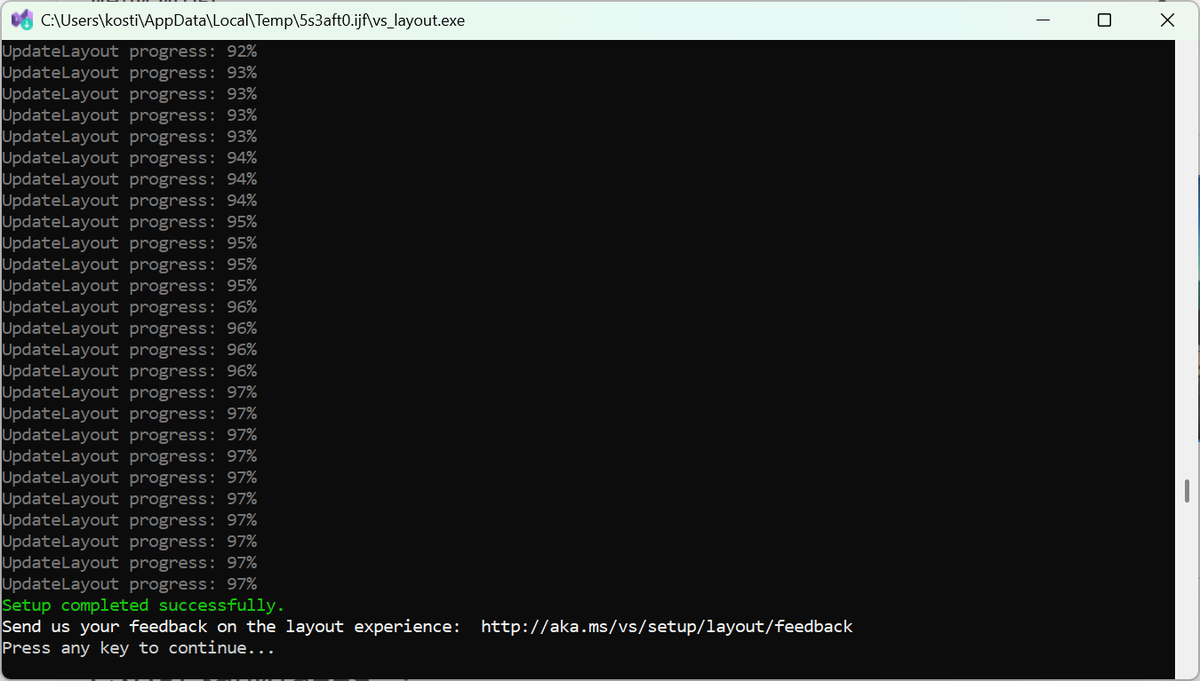
The setup will download all required files by default, as shown below:
Final Steps
To ensure that everything is installed and configured correctly, create a new driver project as depicted below:
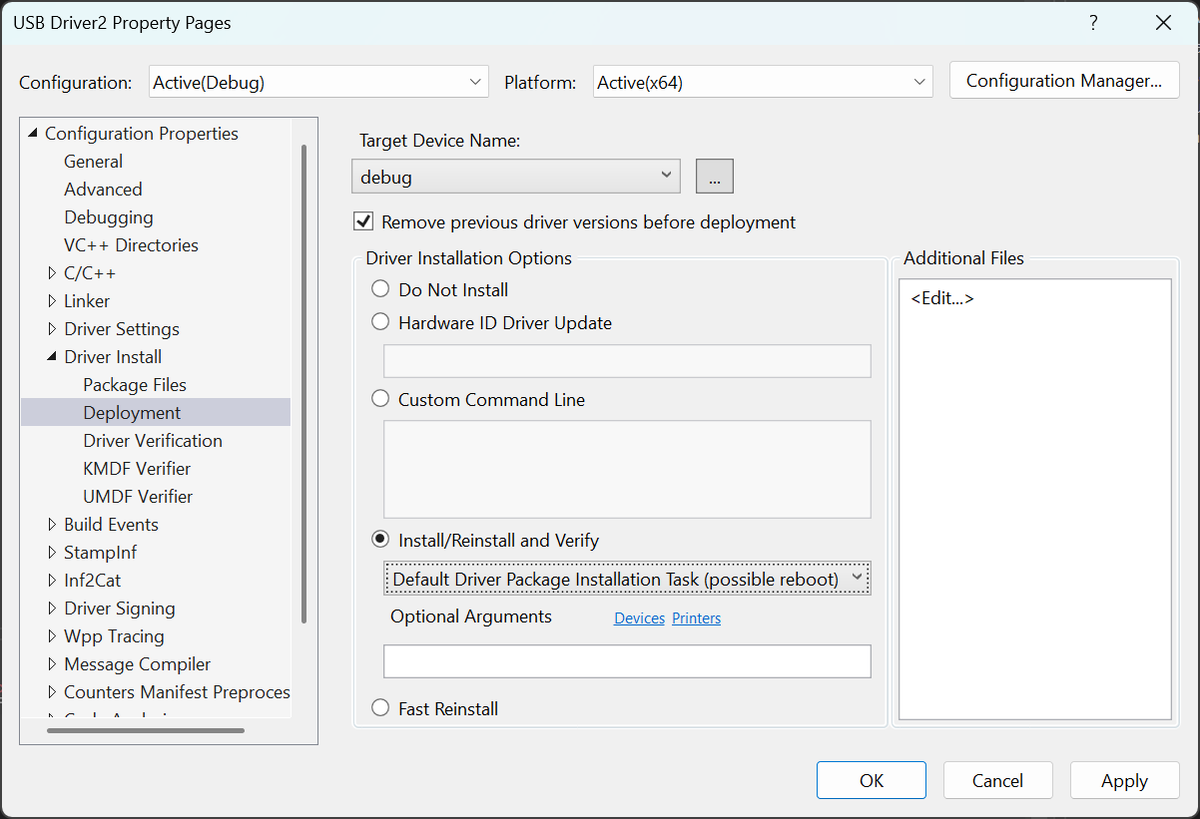
In the solution properties, under Driver Install / Deployment, select your target device for installation, which was configured previously:
In our case, this is the “debug” target device name. Click OK.
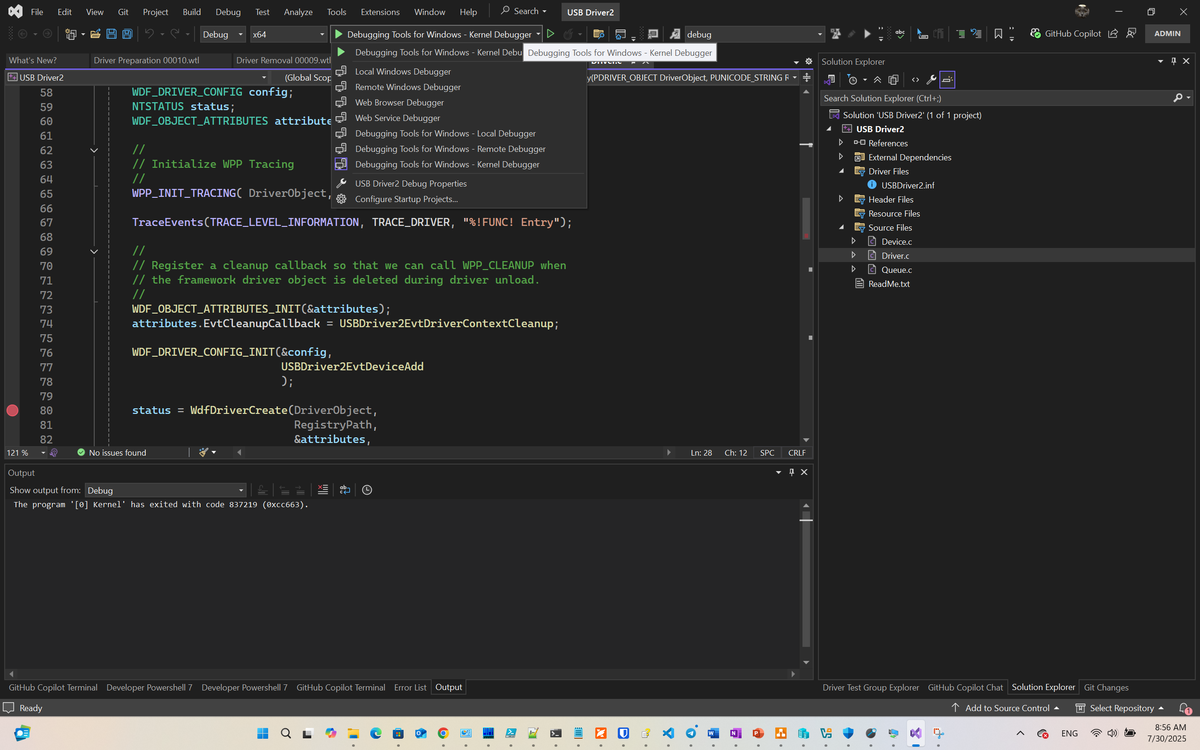
The final step is to click on Debugging Tools for Windows – Kernel Debugger:
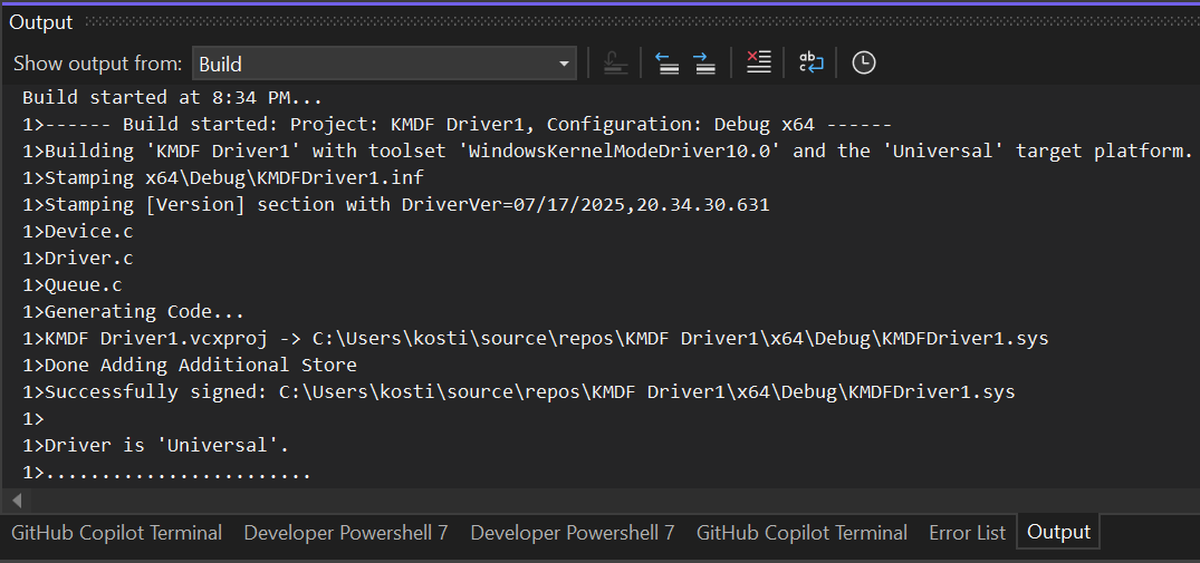
The driver should be successfully built, signed with a testing private key for driver signing, and then provisioned to the target VM machine.
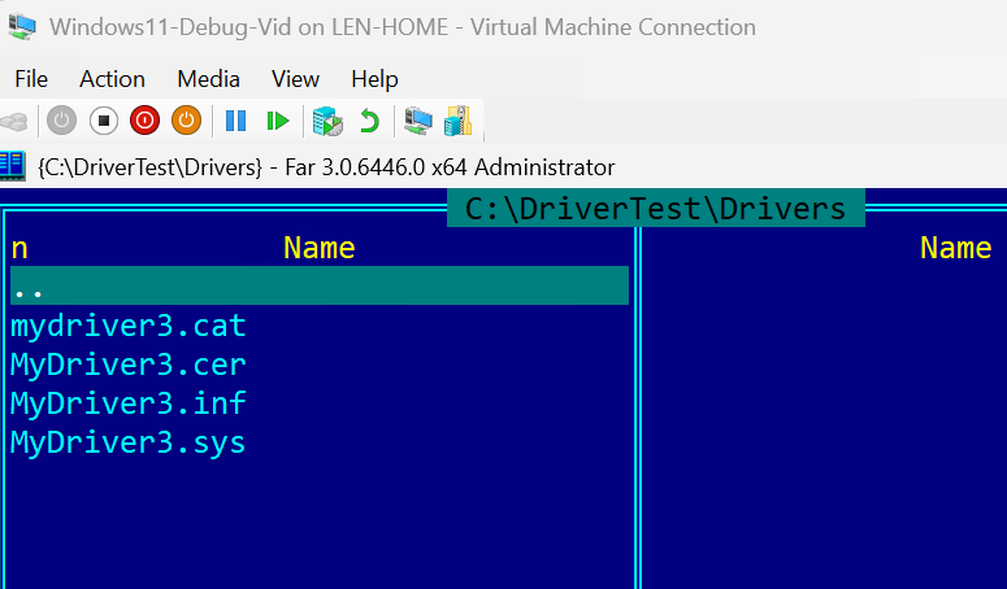
On target VM machient the driver can be found in the C:\DriverTest\Drivers directory:
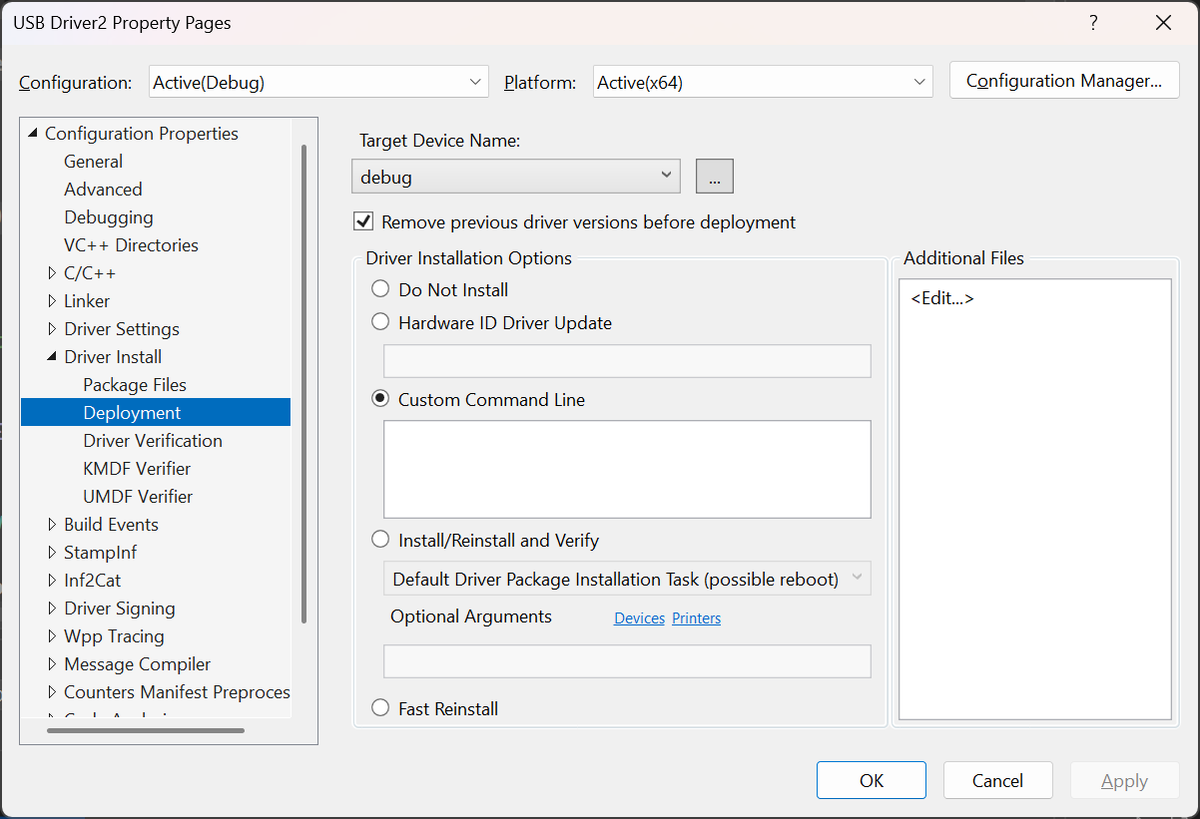
By default, the driver is not installed automatically on the target machine. You need to perform additional configuration steps in the solution configuration properties under Driver Install / Deployment:
Congratulations! Everything required for Windows driver building, configuration, provisioning, and debugging is now ready for use.
Enable Boot Debugging
As a final step on the Virtual Machine, enable boot debugging with this command:
bcdedit /set bootdebug on
This will allow the debugger to break in to the Windows Boot Loader (Winload.efi) during system startup, enabling you to debug the early boot process.

